QUICK START

From an empty channel to on air, in five steps.

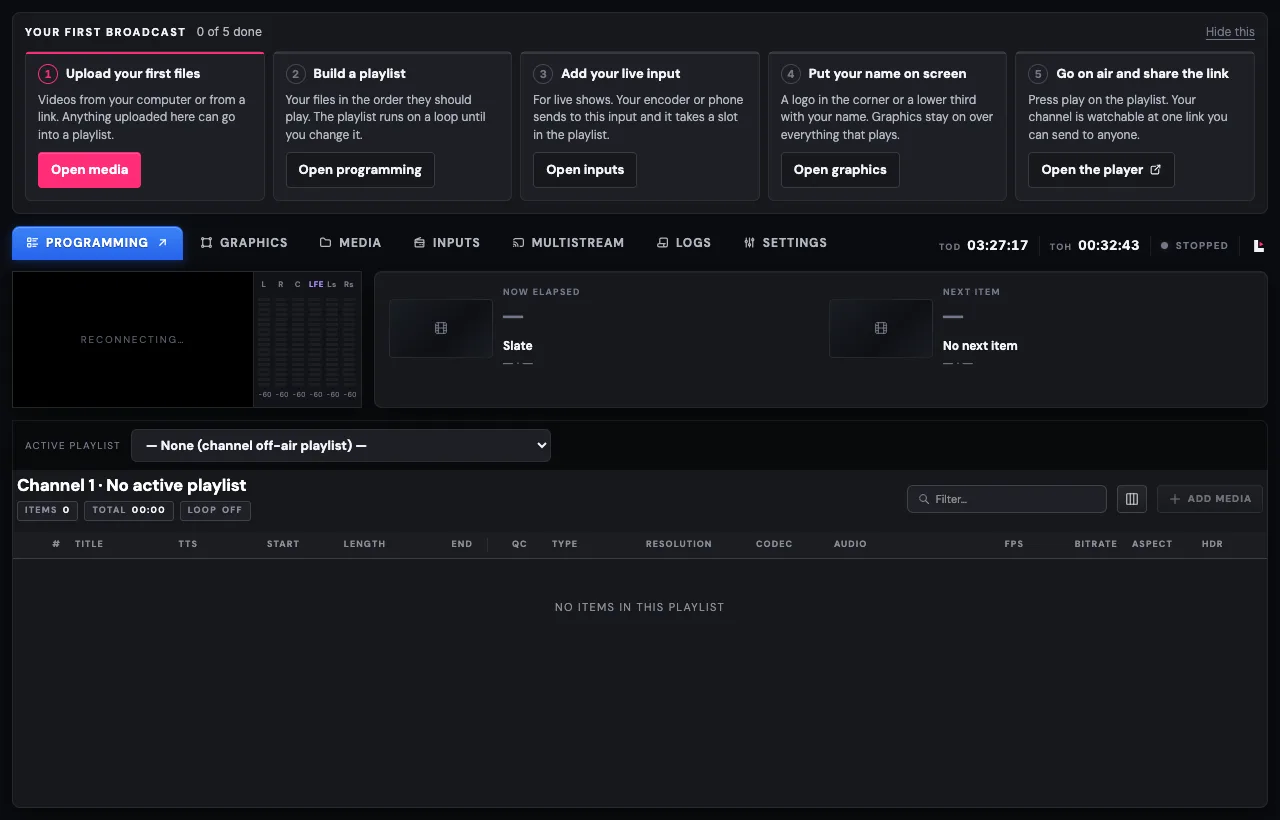
A new channel opens on a blank programming tab with a five-row checklist above it. The rows tick themselves as you go: the first file that finishes processing, the first playlist with something in it, the first live input, the first graphic, and the moment the channel is on air. This page is the same five rows, with the screen each one happens on.

The channel dashboard with the five-row first broadcast checklist above the programming tab
Step 1

Upload your first files

Open the Media tab. The Upload button takes files from your computer, and Import URL takes a direct link to a file that is already online, which is the faster route for a large archive sitting on another server. You can also drop files straight onto the library. Video, audio and images are all accepted.

Each file is processed after it lands, so it shows a status for a while before it is playable. The checklist ticks on the first file that finishes, and a file that failed to process does not count, so if the row stays open after an upload, look for a file with an error against it and upload it again. The library is per channel: a second channel on the same account has its own, empty one.

Folders are optional. A first week's library rarely needs them, and every file is searchable by name from the box at the top whether it is filed or not.

The Media tab of a new channel: Upload and Import URL at the top, an empty library, a drop zone reading no media
Media tab · Upload or Import URL
Step 2

Build a playlist

Playlists live on the Programming page, one level up from the dashboard. The Open programming button on the checklist takes you there and, if the channel has no playlist yet, creates the first one on the way. It arrives named Untitled playlist with the name ready to edit.

Add item opens the library. Pick one file or several and they land at the end of the playlist in the order you picked them; drag rows to reorder. Back on the dashboard, the Active playlist selector binds one playlist to the channel. That is the one that plays out, and with loop on it runs again from the top when it reaches the end, which is how most channels run their first weeks: one playlist, looping, updated as new files arrive.

The row ticks when any playlist on the channel has at least one item. An empty playlist does not count, and neither does a playlist on another channel.

The Programming page of a new channel, showing the New playlist button and an empty playlist list
Programming page · New playlist, then Add item
Step 3

Add your live input

Skip this step if the channel only plays recorded files. For a live show, open the Inputs tab and press Add input. An input gives one encoder a permanent address to publish to, along with a stream key that works only for this channel and only until you revoke it. That address and key go into your encoder, or into the phone app you stream from, and stay the same from week to week.

The input then appears as a live block you can place in a playlist: Add live on the dashboard, pick the input and give it a length. When the slot comes round the channel switches to the feed, and when the feed stops, or the slot runs out, it goes back to the playlist. The input shows as connected once your encoder is publishing to it, so you can check the feed is arriving before the slot comes round.

Only the channel owner can add an input. If you were invited to the channel by someone else, the checklist row says so instead of showing the button; ask the owner to add it, and you can place it in the playlist yourself afterwards.

The Inputs tab of a new channel with the Add input button and an explanation that an input gives one encoder a permanent address
Inputs tab · Add input
Step 4

Put your name on screen

The Graphics tab is a canvas the size of the picture. The left toolbar adds text, shapes, an image, a ticker or a clock, and under Starters there is a ready-made lower third, a news bug and a side ribbon to begin from instead of a blank layer. The dashed frames on the canvas are the safe zones: anything inside the inner one is visible on every television, including the ones that crop the edges.

A logo in a corner is the usual first graphic. Add an image, drop your logo file on it, drag it to the corner, and it stays there over everything the channel plays, recorded or live. A lower third with the channel name is the usual second one. Save template keeps a layout you want to reuse, and Upload a template takes one built elsewhere.

Nothing is on the channel until you add it, and the row ticks on the first graphic or template that exists, whether it is showing or not. Live BG puts the current output behind the canvas so you can line a graphic up against real pictures.

The Graphics tab of a new channel: the add toolbar and starters on the left, an empty canvas with safe zone frames in the middle
Graphics tab · Add, or start from a lower third
Step 5

Go on air and share the link

With a playlist bound, the transport controls on the dashboard rundown light up. Play from beginning starts the channel from item one; the on-air row in the rundown follows what is playing, and the tally at the top right of the console changes from Stopped to On Air. From then on the channel runs on its own. It keeps playing overnight, through the playlist loop and through any live slots, until you change something.

The last row of the checklist is also where the link lives. Open the player copies the channel's watch link and opens it in a new tab, so the first thing to do once the tally reads On Air is to send that link to someone and ask what they see. The Multistream tab is for the other places the same output should go, YouTube, Facebook, Twitch and any custom RTMP destination, each added once and left running.

This row ticks from the channel's live status rather than from anything you saved, so it is the one that can untick again: if the channel goes off air, the checklist comes back with four of five done. Hide this puts the card away; if the channel is still off air a week later it shows once more, and a second Hide is for good.

The Multistream tab of a new channel with the program monitor, the now and next strip, and an Add destination tile
Multistream tab · Add destination

Pick up where the checklist is

The card on your dashboard already knows which of the five is done. Open the console and take the next open row.

Open the console
GET STARTED

Your channel can be live in minutes.

No contract and cancel anytime, with a 7-day money-back guarantee on your first purchase.